Authentication and authorization in Gin application with JWT and Casbin
Introduction
JWT Concepts
JSON Web Token (JWT) is an open standard (RFC 7519) that defines a compact and self-contained way for securely transmitting information between parties as a JSON object. It’s one of the most popular ways of authentication. It’s an encoded string that can contain any amount of data and it is cryptographically signed (by the server side). No middleman can modify it.
NOTE: It’s always best practice to use HTTPS with JWT.
The JWT token consists of 3 parts:
- Header
- Payload
- Signature
Header
It contains information about the alogirthm used to generate the signature. These could be HMAC, SHA256 or RSA. It is Base64 encoded to form the first part of the JWT.
The header can also hold an additional information like “kid” [key id]. This is particularly useful when there are multiple keys used to sign different kinds of tokens within your application and have to look up the right one to verify the signature.
Payload
This is the second part of the token. It contains claims, which are statements/fields about an entity and any additional data. In JWT, there are 3 main types of claims — registered, public and private.
The most widely used claims are iss, exp and sub.
iss — issuer is used to identify the issuer of the the JWT.
exp — expiration time of the JWT
sub — subject identifies the principal
This payload is also Base64 encoded.
Signature
This is created from the encoded header, encoded payload, algorithm in the header and a secret key.
The final output is 3 base64 URL strings separated by dots that can be sent in HTTP requests.
Benefits
There are benefits to using JWTs when compared to simple web tokens (SWTs) and Security Assertion Markup Language (SAML) tokens.
- More compact: JSON is less verbose than XML, so when it is encoded, a JWT is smaller than a SAML token. This makes JWT a good choice to be passed in HTML and HTTP environments.
- More secure: JWTs can use a public/private key pair in the form of an X.509 certificate for signing. A JWT can also be symmetrically signed by a shared secret using the HMAC algorithm. And while SAML tokens can use public/private key pairs like JWT, signing XML with XML Digital Signature without introducing obscure security holes is very difficult when compared to the simplicity of signing JSON. Read more about JWT signing algorithms in our blog.
- More common: JSON parsers are common in most programming languages because they map directly to objects. Conversely, XML doesn’t have a natural document-to-object mapping. This makes it easier to work with JWT than SAML assertions.
- Easier to process: JWT is used at internet scale. This means that it is easier to process on user’s devices, especially mobile.
Use
JWTs can be used in various ways:
- Authentication: When a user successfully logs in using their credentials, an ID token is returned. According to the OpenID Connect (OIDC) specs, an ID token is always a JWT.
- Authorization: Once a user is successfully logged in, an application may request to access routes, services, or resources (e.g., APIs) on behalf of that user. To do so, in every request, it must pass an Access Token, which may be in the form of a JWT. Single Sign-on (SSO) widely uses JWT because of the small overhead of the format, and its ability to easily be used across different domains.
- Information Exchange: JWTs are a good way of securely transmitting information between parties because they can be signed, which means you can be sure that the senders are who they say they are. Additionally, the structure of a JWT allows you to verify that the content hasn’t been tampered with.
Casbin
Casbin is a powerful and efficient open-source access control library. It provides support for enforcing authorization based on various access control models.
What Casbin does:
- enforce the policy in the classic
{subject, object, action}form or a customized form as you defined, both allow and deny authorizations are supported. - handle the storage of the access control model and its policy.
- manage the role-user mappings and role-role mappings (aka role hierarchy in RBAC).
- support built-in superuser like
rootoradministrator. A superuser can do anything without explicit permissions. - multiple built-in operators to support the rule matching. For example,
keyMatchcan map a resource key/foo/barto the pattern/foo*.
What Casbin does NOT do:
- authentication (aka verify
usernameandpasswordwhen a user logs in) - manage the list of users or roles. I believe it’s more convenient for the project itself to manage these entities. Users usually have their passwords, and Casbin is not designed as a password container. However, Casbin stores the user-role mapping for the RBAC scenario.
The Application
We will consider a simple todo restful API.
Create a directory called simple-jwt-auth, then initialize go.mod for dependency management. go.mod is initialized using:
go mod init simple-jwt-authNow, we will write our code and our project will be structured as you will see below:
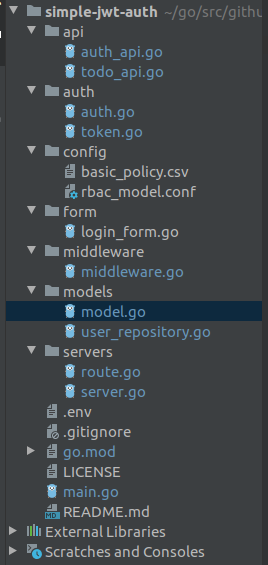
Create models:
Login Request
User provide their credentials to authentication service. When a user’s details have been verified, they are logged in and a JWT is generated on their behalf. We will achieve this in the Login() function defined below:
We received the user’s request, then unmarshalled it into the User struct. We then compared the input user with the one we defined we defined in memory. If we were using a database, we would have compared it with a record in the database.
In this tutorial, we create a mock repository to provide database function:
So as not to make the Login function bloated, the logic to generate a JWT is handled by CreateToken. Observe that the user id is passed to this function. It is used as a claim when generating the JWT.
Implement JWT
In simple implement of JWT, we login and system will generate new access token and send back to us. We use this token to authenticate with system.
But there is a lot wrong with the above implementation:
- The JWT can only be invalidated when it expires. A major limitation to this is: a user can login, then decide to logout immediately, but the user’s JWT remains valid until the expiration time is reached.
- The JWT might be hijacked and used by a hacker without the user doing anything about it, until the token expires.
- The user will need to relogin after the token expires, thereby leading to poor user experience.
We can address the problems stated above in two ways:
- Using a persistence storage layer to store JWT metadata. This will enable us to invalidate a JWT the very second a the user logs out, thereby improving security.
- Using the concept of refresh token to generate a new access token, in the event that the access token expired, thereby improving the user experience.
Using Redis to Store JWT Metadata
One of the solutions we proffered above is saving a JWT metadata in a persistence layer. This can be done in any persistence layer of choice, but redis is highly recommended. Since the JWTs we generate have expiry time, redis has a feature that automatically deletes data whose expiration time has reached. Redis can also handle a lot of writes and can scale horizontally.
Since redis is a key-value storage, its keys need to be unique, to achieve this, we will use uuid as the key and use the user id as the value.
Let’s define the TokenManager interface to manage jwt token:
Define AuthInterface to handle authentication session:
We set the token to be valid only for 30 minutes, after which, it is invalid and cannot be used for any authenticated request. Also observe that we signed the JWT using a secret(ACCESS_SECRET) obtained from our environmental variable. It is highly recommended that this secret is not exposed in codebase, but rather called from the environment just like we did above. You can save it in a .env, .yml or whatever works for you.
REDIS_HOST=127.0.0.1
REDIS_PORT=6379
REDIS_PASSWORD=

ACCESS_SECRET=98hbun98hsdfsdwesdfs
REFRESH_SECRET=786dfdbjhsbsdfsdfsdf

PORT=8081
Authorization with Casbin
Casbin configuration
In Casbin, an access control model is abstracted into a CONF file based on the PERM metamodel (Policy, Effect, Request, Matchers). So switching or upgrading the authorization mechanism for a project is just as simple as modifying a configuration. You can customize your own access control model by combining the available models. For example, you can get RBAC roles and ABAC attributes together inside one model and share one set of policy rules.
The most basic and simplest model in Casbin is ACL. We create a simple model for providing ACL in our application:
A model configuration file tells Casbin how to determine if a user has some qualifications. In the above example, we just declare some stuff:
r = sub, obj, actdefines that a limited request will consist of 3 parts: *sub*ject - user, *obj*ect - URL or more generally resource and *act*ion - operation.p = sub, obj, actdefines the format of policy. For example,admin, data, writemeansAll admins can write data.e = some(where (p.eft == allow))means that a user can do something as long as there is a defined policy which allows him to do so.g = _, _defines the format of definition of user's role. For example,Alice, adminindicates Alice is an admin.m = g(r.sub, p.sub) && r.obj == p.obj && r.act == p.actdefines the workflow of authorization: check user's role -> check the resource which user is trying to access -> check what user wants to do.
Note that there are at least four sections in a model configuration file: request_definition, policy_definition, policy_effect and matchers. Sometimes we don't do RBAC so role_definition section is not necessary.
Policies
Casbin policies can be stored in CSV file or in SQL database. But in this example, we store them in CSV file.
Let’s say we have some policies and user groups like this:
p, user, resource, read
p, username, resource, read
p, admin, resource, read
p, admin, resource, write
g, alice, admin
g, bob, user
Here we firstly define 3 policies:
- All users can only read data.
- All admins can read data.
- All admins can also write data.
Then we assign roles to user:
- Alice is an admin.
- Bob is a user.
Thus Alice has full control over data while Bob can only read data. He will be blocked if he wants to write data.
Enforce Casbin Policies
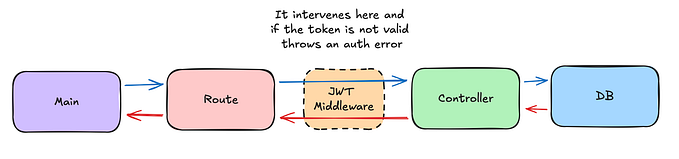
Firstly, let’s define a middleware in which our policies will be enforced:
Second, we modify login and logout method to add authentication and authorization feature.
Create todo
We can now proceed to make requests that require authentication using JWT.
One of the unauthenticated requests in this API is the creation of todo request.
We have defined the Todo struct in the previous steps:
type Todo struct {
   UserID string `json:"user_id"`
   Title  string `json:"title"`
   Body   string `json:"body"`
}
Now, we create TodoApi
Before start application, we must create routes and set Gin to use casbin midleware for authentication:
Conclusion
This is a simple tutorial to help you create authentication and authorization in Go. For more information and complete source code, be sure to check out this GitHub repo. You can extend this application and use a real database to persist users and todos and casbin model and policies.